Today I’m taking a detour from what Scholomatch is and into how we built it. Get some popcorn if you’re excited about the rich and fascinating world of TOOLS ENGINEERING!
Early on I knew two things that dictated what the tools on Scholomatch would be:
- The game was going to be very branching and nonlinear.
- I’m a fast engineer, but I absolutely suck at understanding and building on third-party stuff.
Ink and some other tools are amazing, but I knew that in the long run I should be rolling my own solution, so I did. Our tool is built on top of Unity’s shader graph, following this amazing tutorial: https://www.youtube.com/watch?v=nvELzBYMK1U&list=PL0yxB6cCkoWK38XT4stSztcLueJ_kTx5f
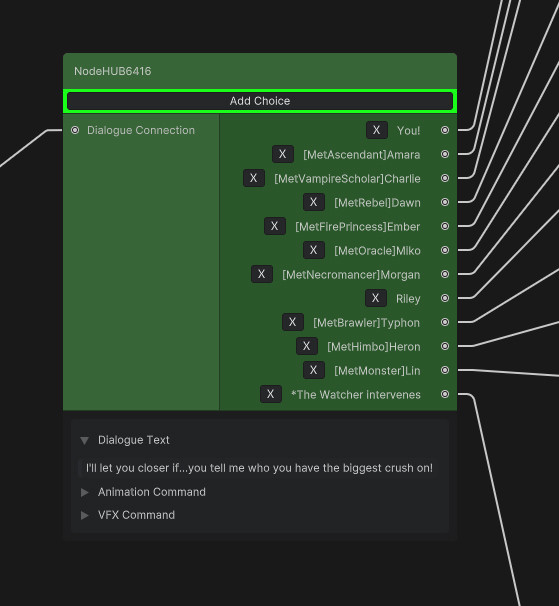
The end result is straight forward. We have Nodes that contain content and they string together with Choices. The main game script reads all those things and turns them into dialog panels and buttons.
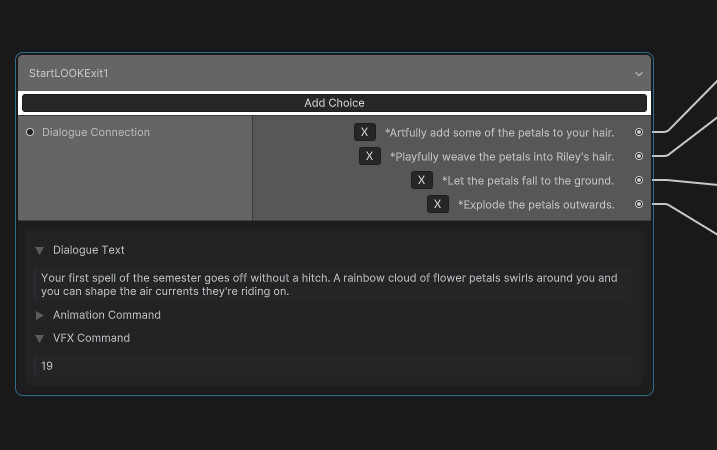
Panels also have an AnimationCommand field that controls character expressions and a VFX Command field that triggers vfx, and also controls things like whether characters are hidden from view and that sort of thing.
There are lots of other specialty nodes. Adding and removing characters from scenes, storing choices and branching logic based on conditions, and little things like setting a character’s name to be known.
At the moment there are ten types of Nodes in Scholomatch. Partway through I realized that there was a lot of other stuff I needing to be able to do that I didn’t want to make entirely new nodes for and I didn’t want to add a bunch of extra fields to the nodes we had.
So I did something a little weird that works GREAT for me, but probably wouldn’t be the best choice for a larger studio where lots of folks need to understand what’s going on.
I used in-node mark-up, both in the ‘Choices’ entries, and in the node title/ID. For choices, I have markup that changes between things you say vs things you do, as well as little mood icons, and conditionals so I can show some choices only when certain conditions are or aren’t met.
But a ton of the game’s logic actually lives in the Node IDs. That’s where we set panels as being main character, secondary character, or narrative panels. It’s also where we set commands like if a character should close their eyes.
Also specialty things. For instance, some nodes have TIME in the ID, which means, “Set the time of day to what’s in my content box.” All these things are processed separately, so they can be combined. There’s a node in the game with the ID Node25ALTEYESCLOSEDPOOFBACKGROUND, which does a lot of work.
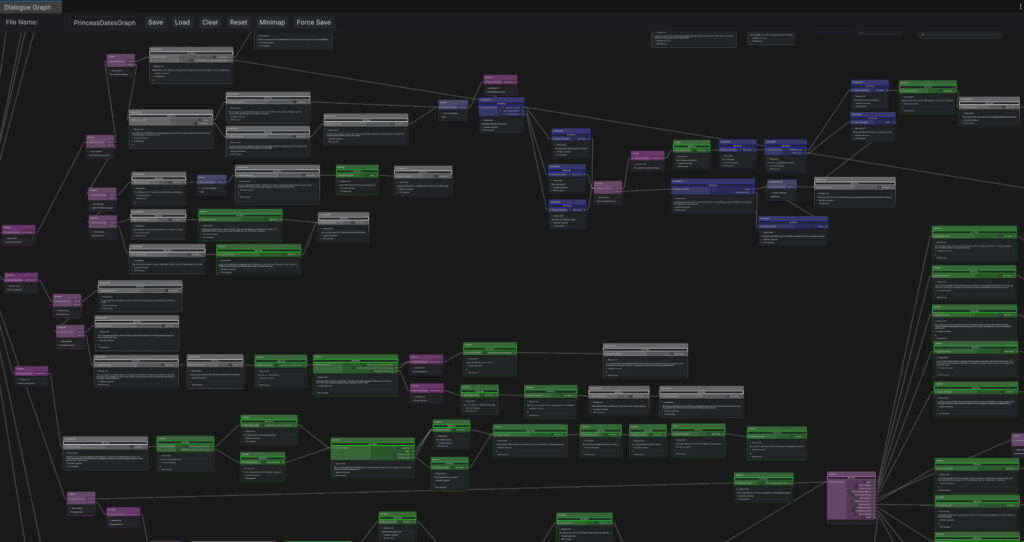
nd it’s all color-coded. Green for dialog, white for narrative, blue for secondary character, magenta for logic, black for functional nodes (like changing music). Graphs can become monstrous, but even the worst ones I can parse pretty well. Here’s part of Ember’s Bonus Scenes graph, as an example.
Looking back, I’m happy with the choices I made and what we built. This approach did have two huge downsides:
- Working outside a text editor made spell-check and things like that a pain.
- Saving graphs used to take a very long time, until Unity6 fixed that.
If I’d gotten something else out of the box, the friction of changing it would have stopped me from making the game as branching as we wanted it. We leaned into power over ease and ended up with a story that feels rich and responsive to me. Like a 7 on the Linear-to-BG3scale of dynamic storytelling.
I don’t know if anyone is interested in the engineering side, but if you have questions about any of this just ask.